Installing a new vinyl flooring can give your bathroom a glow-up. However, it can shorten the flooring’s lifespan if not installed correctly. But this will not be your concern since we’ve learned how to install it perfectly so you can get the best out of your new floor for a long time. Let’s start!
Installing a vinyl flooring in your bathroom requires the following steps:
- Prep the old floor
- Cut a full-size paper template of your bathroom
- Cut and nail down underlayment on the bathroom floor
- Cut vinyl flooring
- Attach the vinyl to the bathroom floor
- Finishing touches with caulk
In this post, we will thoroughly discuss these steps, how much this project will cost, how to maintain the new floor and the other factors that may concern. If you are interested in learning all these, keep scrolling down.
Installing A Vinyl Flooring In The Bathroom

Installing a vinyl floor can be an easy task if you are going to follow the following steps.
Step 1
The goal in preparing the floor area is to have a clean, flat, and dry surface. Start by removing the toilet, sink, and trim around the bathroom.
How To Remove A Toilet
First, turn off the water supply by shutting off the valve below or behind the toilet. Drain the water tank by holding the flush handle until the water stops going down. Sponges can soak the remaining water. Then disconnect the water supply tubes from the toilet tank using pliers and unscrew the plastic bolt cover located at the base of the bowl.
Next, A sharp cutter can cut the caulk that surrounds the bottom of the toilet. This will break the linkage of it to the floor. With the help of another person, pull up the toilet bowl and carefully lie it down outside where it’s safe from breaking.
How To Remove A Sink
You should shut the valves off or turn off the primary water source. After that, start disconnecting the water supply lines using a wrench. Then go to the U-shaped part in the drain pipe. That is called the P-trap. Place a bucket under it before loosening the nuts that keep it together. Some water may still be remaining there.
Remove all the clips that are attached to the sink from the countertop. If you are not replacing your vanity, there is no need to remove it anymore. However, disconnect the backsplash from the wall if your sink and countertops are built-in together. Remove the sealants that bond the sink and counter, as well as the pedestal sink and the wall using a utility knife.
How To Remove A Trim
Cut the joint bonds using a cutter first, then choose a starting point [preferably at the edge]. Create a gap by tapping the putty knife behind the molding. Once a space is loose enough, slide in the pry bar of the peen of the hammer. Repeat until you reach the other end, then pull out any leftover nails.
If you are not going to replace the baseboard with a new one, be extra careful when removing it so you can install it again afterward.
After that, remove the old tile or any flooring with a pry tool. Smoothen the surface using a scraper, floor grinder, or other power tools before sanding to remove rough parts from previous materials like mastic. Once done, ensure the bare floor is in good condition, level, and with no nails sticking up.
Step 2
Create a template by placing pieces of hard paper on the bathroom floor to get its shape. Pin it on the ground using masking tape to keep it from shifting. Using the same bonding material, bind the overlapping paper edges. For areas where the fixtures are like the toilet and vanity area, trace the shape’s pattern with separate paper and stick them to the main template.
Leave an inch gap between the template and the wall. However, there are cases where a roller aid is included in the vinyl installation kit to help them mark the floor pattern.
Step 3
This step can be skipped if you do not use an underlayment. However, if you are, you can start cutting it to fit your bathroom floor. Underlayment differs based on many factors, but one of the most common material is a high-quality plywood-like birch with a ¼-inch thickness.
It is better to let it rest inside your home for a day to allow it to adapt to the humidity inside your home before arranging it according to the shape of your bathroom floor. After cutting holes for the fixtures, secure it to the ground with a staple, start with one edge and work your way every two inches on the exterior and four inches on the interior corner to make sure there are no lumps formed.
Step 4
After attaching the underlayment, this step will depend on the type of vinyl you use.
- Vinyl sheet – Start unrolling the vinyl sheet on the ground and put the template on top. To prevent it from moving, tape the edges before tracing the outline. The cutting, assembling, and seaming techniques differ based on the type and brand you will use. To ensure the right way, check out your manufacturer’s instructions.
- Vinyl tile – Measure the floor’s width in half and mark each side’s center with a chalk line that stretches from wall to wall distance. Snap another vertical line to the two center points you marked, then put another to divide the room into quarters.
Step 5
Once the previous step is done, you can start situating the vinyl flooring.
- Vinyl sheet – Lay it flat on the bathroom floor to see if it fits perfectly. If it does, roll half of it and spread the adhesive evenly at a 60-degree angle along the underlayment’s visible surface using a notched trowel. Do not roll it back immediately; check the adhesive container for “open time” instructions. Repeat the process to the second portion.
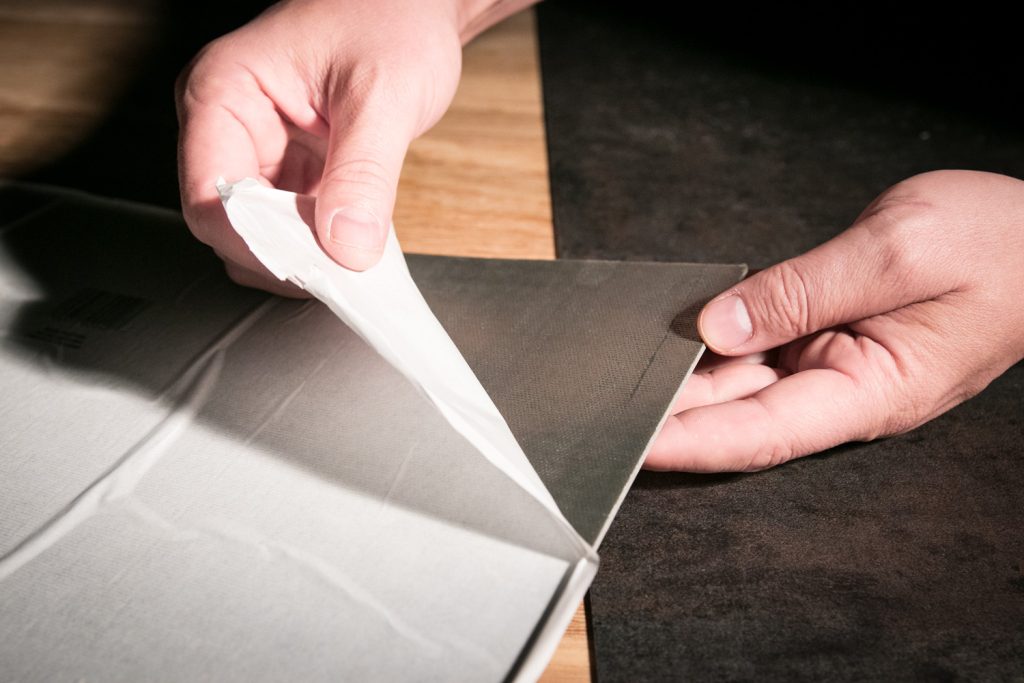
- Vinyl tile – With the quadrants you formed earlier, peel off the back sheet a tile and press it to the corner of the chalk line in the center. From there, fill the rest of the floor area. You will usually need a smaller tile near the wall, measure how much you need, and cut it using a vinyl tile cutter.
Roll either of the vinyl floorings with a J-roller to ensure that it is compacted to the underlayment.
Step 6
Install the toilet, sink or vanity, and baseboard back. Using a caulk, fill the gaps between them and the new vinyl floor.
Can You Mix And Match Vinyl Plank Flooring?
Yes, mixing different color tones of the vinyl plank to create a pattern is fine. This makes your flooring design personalized and unique to represent its owner. Just make sure to use the same texture, width, and thickness. You can see some of the mixtures done by other homeowners below.
How Much Does It To Install A Vinyl Floor?

The total cost of having a professional install your vinyl flooring depends on several factors, such as your area’s labor cost, the materials to be used, quality of the vinyl, installation method, and the core construction. However, the estimated price ranges from $928 – $3 659, and the national average is $2,286. The estimated cost per kind of vinyl flooring can be seen below:
- Vinyl plank flooring: $2 – $7 per square foot
- Luxury vinyl plank flooring: $1.50 – $10 per square foot
- Vinyl sheet: $0.50 – $2 per square foot
When it comes to labor costs, professionals typically charge between $3 to $10 per square foot or $36 per hour. The materials to be used are not included there yet.
How To Maintain A Vinyl Floor

Vinyl floors can last 10 to 20 years if properly maintained and taken care of. Here is how you can do that:
- Remove dirt once you’ve seen it. Clean using a vacuum, sweeping, or simple hand picking.
- Do not scrub the vinyl floor with hard objects or pull heavy furniture to prevent scratches.
- Use a vinyl cleaner rather than random detergents to prevent discoloration.
- Wipe any spill of liquid right away.
- Put a rug on areas where people in your house often go to reduce the amount of dirt or dust in their shoes.
To Wrap It Up

Installing vinyl flooring is a task you can easily do upon following the steps above. However, if you are not confident with your skills, it’s better to ask for professional help. Be coordinated with your hired carpenter if you want a mixture of designs.
Lastly, make sure to take note of the tips discussed since harsh materials and prolonged dirt may shorten the lifespan of our vinyl flooring.