The Ideal Size for Your Compost Bin
When embarking on your composting journey, selecting the appropriate size for your compost bin is crucial. A variety of bin shapes and dimensions exist to accommodate different needs and spaces. If you are aiming for a traditional passive compost pile, a minimum space of three feet by three feet is advisable. However, for optimal results in microbial activity and decomposition, a size of at least four feet by four feet by four feet is recommended. This dimension not only supports a robust composting process but also enables you to create a hot compost pile, which is our intended goal.
In an ideal setup, having the option for multiple compost piles is beneficial. This is typically achieved by constructing separate sections or “bays” that facilitate rotation and frequent turning of the compost. A classic three-bay compost system allows for one area to be actively filled with fresh materials, another to be regularly turned, and a third section to hold the finished compost, ready for application in your garden.
This guide will detail the construction of a three-bay compost bin, but feel free to adapt the instructions to create a single bay, double bay, or a smaller version as needed. In fact, we previously managed with just a single bin at our urban homestead, which worked quite effectively.
Introducing Our Compost Bin Design and Plans
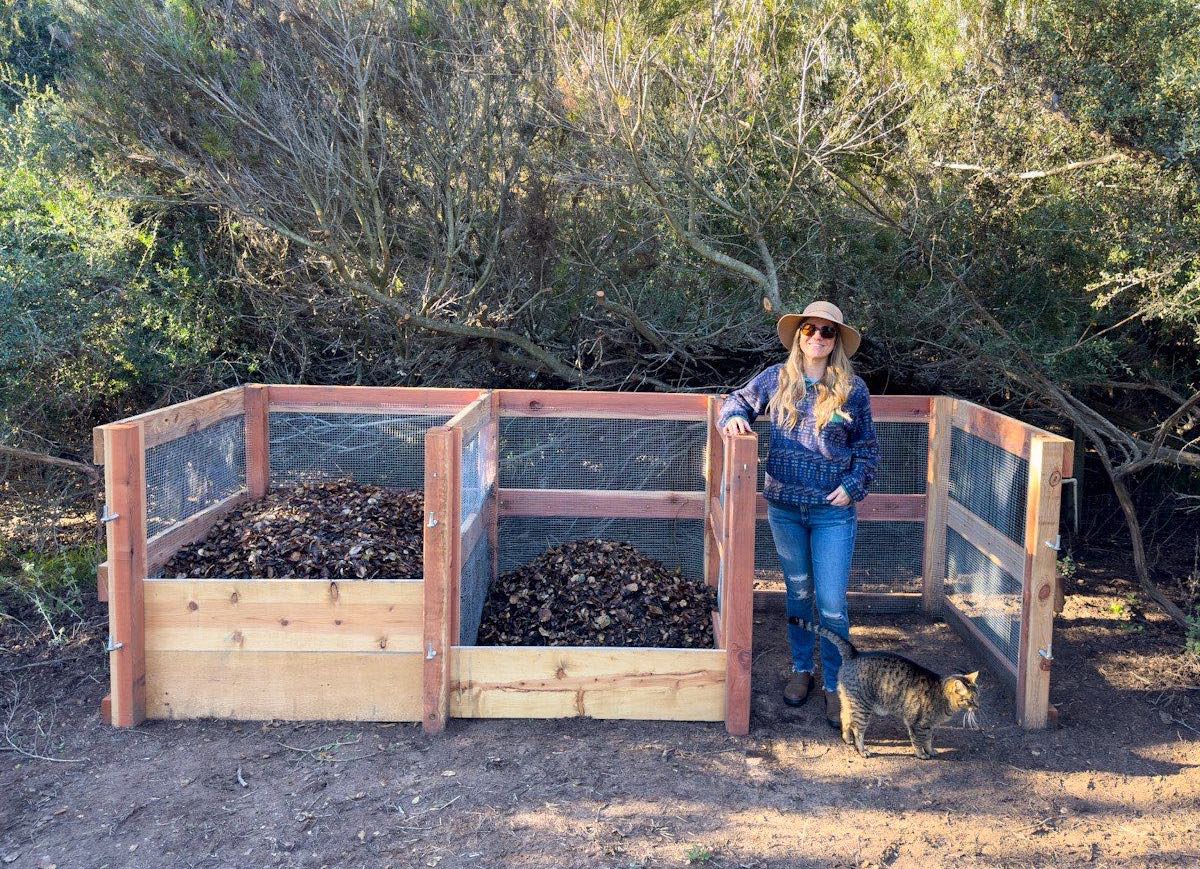
Our compost bin design features three distinct bays, each measuring four feet on each side, with a total footprint of approximately 12 feet by 4 feet. This design promotes efficient composting and provides ample space for all your composting needs. Additionally, I’ve included a simplified illustration of an alternative compost bin design for those who may prefer a different approach, though the materials and instructions will differ slightly.
A standout feature of our compost bin is the incorporation of removable face boards. These boards can be inserted into tracks or slots along the front of each bay, allowing you to stack the compost higher without it spilling out. This design maximizes the bin’s capacity and fosters a more efficient decomposition process, essential for hot composting.
It’s important to note that our compost bin was designed with specific requirements in mind. Not only did we prioritize durability and functionality, but we also needed a structure that could withstand the enthusiasm of our miniature donkeys, who are known to lean against wooden structures. Building the bin within their pasture allows for easy management of the manure they produce, which is invaluable for creating compost.
Considering Donkeys, Gates, and Design Adaptability
As we embarked on constructing our compost bin, we had to account for the presence of our four mini donkeys, each weighing around 250 pounds. These whimsical creatures are quite fond of rubbing against wooden posts, so we opted for robust lumber and additional support braces to ensure the compost bin could endure any exuberant interactions. Their love for exploration means we had to carefully design the bin layout.
To enhance the functionality, we incorporated hinged gates at the front of each bay. These gates serve two purposes: they keep the donkeys out of the compost and help deter other critters from accessing the materials. Precision was key in determining the width of each bay to ensure the gates fit perfectly. The walls needed to be straight and level, as the gates require a proper alignment to function effectively.
However, you need not feel constrained by specific requirements if your situation allows for a bit more freedom. Feel free to adapt the size and dimensions of your compost bays to suit your unique needs. It’s perfectly acceptable if the bays are not identical in size or level; the primary goal is to create an efficient composting system that works for you.
Necessary Supplies for Building Your Compost Bin
To set up your compost bin efficiently, you’ll need a selection of materials and tools. Our construction utilized minimal wood to ensure adequate airflow, which is essential for successful composting. Instead, we opted to line the walls with hardware cloth, requiring approximately 25 to 30 feet of four-foot wide, half-inch hardware cloth for our bin size.
Hardware cloth is an excellent choice for compost bins due to its durability. It remains taut under the weight of compost, its gaps are small enough to retain compost while keeping pests at bay, and it is galvanized to prevent rust, ensuring long-lasting usage. While chicken wire is an alternative option, it is less durable and might require additional wooden supports to maintain stability over time.
When deciding where to place your compost bin, consider accessibility to your garden or home. It should be conveniently located yet far enough away to avoid unpleasant odors or attracting flies. A well-maintained compost pile should not emit strong odors, but it’s wise to consider the placement carefully.
Step 1: Selecting a Location and Preparing the Site
The placement of your compost bin is critical to its effectiveness. Ideally, choose a location that is relatively level and close to your garden for easy access. Sunlight can speed up the decomposition process, while shade helps retain moisture. Find a balance that works for your environment; if you opt for full sun, be prepared to water the pile more frequently.
It is best to leave the base of the compost bin open to the native soil beneath. This promotes natural earthworm activity and allows beneficial microbes to thrive. Before construction, clear any debris from the site and level the ground to ensure a stable foundation for your compost bin.
As you prepare the site, consider the size of your compost bin and how much space it will occupy. Take into account the ease of accessing the compost for turning and harvesting, and ensure that it is not situated in an area that floods or retains water.
Step 2: Measuring and Cutting Wood
Once you have selected and prepared your site, the next step is to gather your lumber and measure the pieces required for your compost bin. Begin by cutting the boards to the desired dimensions based on the design you have chosen. It’s essential to be precise in your measurements to ensure each part fits together seamlessly.
Before securing the pieces with screws, double-check that everything is square by using a carpenter square or measuring tape. This step is crucial to avoid any misalignment as you progress. When working with the 4x4s, measure the distance at both the top and bottom to confirm they are even.
For our compost bin, we determined that two interior walls, spaced four feet apart, were necessary. The result should be approximately 43.5 inches apart when measuring from the inside edges of each 4×4. If you choose, you can attach the hardware cloth to the back and side walls first before constructing the inner walls, as long as it does not obstruct where the walls will connect.
Step 3: Assembling the Outer Walls of the Compost Bin
To begin building the compost bin, start by constructing the outer walls. Lay two 4×4 corner pieces on a flat surface, spaced apart according to your design. Then, position three horizontal 2×6 boards across the 4x4s: one at the top, one at the bottom, and one in the middle.
Ensure the ends of the 2×6 boards are flush with the sides of the 4x4s and secure them using long screws. Repeat this process for the second outer wall to create two end walls for your compost bin.
Once both end walls are complete, stand them upright in the location you’ve chosen for your compost bin. Connect the two outer walls with horizontal boards along the back, forming the overall structure. It’s essential to keep the 2x6s on the outside, with the 4x4s facing inward, as the corners provide the lip needed for the removable boards.
Step 4: Adding the Back to the Exterior Walls
After establishing the structure of the outer walls, it’s time to attach the back. If you’re using 12-foot boards, simply secure them between the two end walls. However, if you’re working with 8-foot boards, you may need to connect them by utilizing a combination of 4-foot and 8-foot boards, ensuring they meet flush against the corner 4x4s.
As you attach the back boards, continuously check for level and straightness to ensure your compost bin is sturdy and well-constructed. This attention to detail will pay off during the composting process, as a solid structure will hold up against the weight of the compost.
In this step, take your time to ensure everything is secured correctly and that the back wall aligns perfectly with the outer walls. This will contribute to the overall integrity and functionality of your compost bin.
Step 5: Constructing and Installing the Inner Walls
With the outer structure complete, you can now focus on building the inner walls. These walls will create separate bays, allowing you to manage your compost more effectively. You can either assemble the inner walls separately and attach them to the back wall or construct them in place.
For our compost bin, we opted to build the inner walls in place, as one of the inner wall 4x4s was already secured to the back. Use fence rail brackets to connect the 2x6s to the 4x4s, ensuring they are level and straight. This step is crucial for maintaining the stability of the overall structure.
As you secure the inner walls, ensure they are spaced approximately four feet apart. This measurement is essential for proper airflow and decomposition. Additionally, secure the vertical boards to provide added support.
Step 6: Installing Hardware Cloth
Now that the framework is set, it’s time to add the hardware cloth to the interior walls and back. Hardware cloth is designed to provide ventilation for your compost while preventing pests from infiltrating the bin. Measure and cut the hardware cloth to fit each wall individually, securing it with 1-inch cabinet screws.
When attaching the hardware cloth, be cautious of sharp edges. It’s advisable to work slowly, ensuring that it is flush against the walls and properly secured. Overlap the hardware cloth onto the 4x4s where needed, but keep it flush with the front edges to avoid obstructing the removable face board slots.
Continue to secure the hardware cloth until all inner walls and the back are covered. This will create a breathable environment for your compost, promoting efficient decomposition.
Step 7: Creating Slots for Removable Face Boards
To complete the compost bin, you will need to construct the slots or tracks for the removable front boards. This involves adding vertical 2x4s to the front inner walls of each bay. These slots will allow you to easily add or remove compost as needed.
Secure each vertical 2×4 about 1 to 1.25 inches back from the 4×4 at the front of each wall. This spacing will create enough room for the removable face boards to slide in and out smoothly. Ensure that the spacing is even along the length of the walls to guarantee proper functionality.
Once the slots are installed, measure the lengths needed for the removable face boards. It’s best to wait until the compost bin is fully assembled to ensure a proper fit. You may find that the widths of your bays vary slightly, necessitating custom cuts for each board.
Step 8: Final Touches to Your Compost Bin
At this stage, your compost bin is nearly complete! However, consider adding finishing touches to enhance its functionality and aesthetics. For added stability, you might install flat corner braces on the top of each wall, which will help reinforce the overall structure, especially if your design needs to withstand the weight from the compost and curious animals.
We also opted to install lightweight gates on the front of each bay. These gates are equipped with simple latches for easy access and can be removed as needed, providing flexibility in managing the compost. Ensure that the gates are hung correctly using J-bolts for stability and ease of removal.
Finally, if desired, you can add a stain or sealant to the visible wood surfaces to enhance their durability and blend with the surrounding environment. Your compost bin is now ready for use, and you can start adding organic materials!
And that’s how it’s done.
This comprehensive guide has walked you through the entire process of building your own compost bin. We trust that the details provided, along with the photos, have made the construction process clearer and more approachable. Should you have any questions or require further clarification, feel free to reach out in the comments section. We are here to assist you!
Now that you’ve built your compost bin, you might be wondering how to effectively use it. Stay tuned for our upcoming guide on utilizing a three-bay compost bin, including tips on creating a hot compost pile. In the meantime, don’t forget to check out the related articles listed below for additional insights on composting and gardening. Thank you for reading, and happy composting!
How to Construct a Wood 3-Bay Compost Bin Design
Embarking on the journey of building a compost bin doesn’t have to be overwhelming. With this step-by-step guide, you can create a three-bay compost bin tailored to your gardening needs. Embrace the opportunity to repurpose organic waste while producing nutrient-rich compost for your plants!
Whether you are a seasoned gardener or a novice, this compost bin design will simplify the composting process and encourage sustainable practices in your garden. Use the tips and detailed instructions provided to customize your compost bin according to your preferences and available space.
Would you like to save this?
If you found this guide helpful, consider saving it for future reference or sharing it with fellow gardening enthusiasts. Building a compost bin is a rewarding experience that benefits both your garden and the environment. Happy composting!
Frequently Asked Questions: Should a compost pile be in the sun or shade?
This is a common question among new composters. The placement of your compost pile can significantly impact the decomposition process. A sunny spot can help warm the compost, accelerating decomposition. However, it may also dry out the pile more quickly, requiring more frequent watering. Conversely, a shaded area will retain moisture but may slow down the decomposition process. Ultimately, it’s about finding the right balance based on your climate and composting goals.
Step 1: Choosing and Preparing the Site
As previously mentioned, the first step in building your compost bin involves selecting an appropriate site. Look for a location that is level and ideally situated near your garden. This proximity will make it easier to access your compost pile for turning or harvesting.
Keep in mind the sun or shade debate; both have their pros and cons when it comes to composting. A sunny spot can speed up the process but may require additional water, while shade can help maintain moisture but may slow decomposition. Choose a location that suits your gardening style.
Step 3: Assembling the Exterior Walls
After preparing your site, it’s time to assemble the exterior walls of your compost bin. Using your pre-measured and cut wood, lay out the corner posts and attach the horizontal boards as described earlier. This forms the sturdy outer frame of your compost bin.
Be diligent about ensuring that everything remains square and level during assembly. This attention to detail will pay off in the long run, as a well-constructed bin will hold up under the weight of the compost.
Step 4: Attaching the Back to the Exterior Walls
Once the exterior walls are secure, you can proceed with attaching the back. Depending on your choice of board lengths, ensure that the back wall aligns perfectly with the outer walls. This step is crucial for maintaining the structural integrity of your compost bin.
Step 5: Constructing and Installing the Interior Walls
Now that the outer structure is complete, focus on building the interior walls. This step will create the necessary bays for your composting system. Assemble the inner walls either separately or in place, ensuring they are adequately spaced for airflow.
Step 8: Optional Finishing Touches
Before considering your compost bin complete, think about any additional touches that could enhance its functionality. Whether it’s adding extra supports, a protective lid, or a stain for aesthetics, these final details can make a difference in the effectiveness and look of your compost system.