Creating your own compost is an incredible way to minimize waste while producing natural fertilizer for your garden! If you’re considering starting a compost pile, you’re in the right place. This detailed tutorial will guide you through the entire process of constructing a compost bin, encompassing all necessary supplies, our DIY compost bin design, and plenty of visuals to assist you. Plus, you’ll find a condensed printable version at the end of this article!
For over ten years, we’ve engaged in composting using various smaller systems. However, the recent addition of four mini-donkeys to our homestead finally pushed us to create the large 3-bay compost bin we’ve always dreamed of. With their considerable manure output, we’re excited about the high-quality compost we can produce!
Once we finalized our design, the process of building the compost bin turned out to be quite straightforward. It reminded me a lot of constructing a raised garden bed since many of the materials and procedures overlap. Even if you don’t replicate our design exactly, I hope this guide serves as a valuable resource and source of inspiration!
The Best Compost Bin Size
Compost bins can be found in a variety of shapes, sizes, and styles. On our homestead, we utilize everything from compact worm bins and compost tumblers to expansive 3-bay compost bins.
For a traditional passive or slow compost pile, it’s advisable to allocate at least a three-by-three foot space. However, for optimal microbial activity and effective decomposition, a compost pile should ideally measure at least 4x4x4 feet. This size allows for sufficient material to generate heat, making for a hot compost pile – exactly what we intend to achieve!
If space permits, it’s beneficial to establish several piles, typically separated by walls or “bays,” to facilitate rotation and turning of the compost. A classic 3-bay compost system typically consists of one section for actively adding fresh materials, one section that is regularly turned but not added to, and a final section designated for holding finished compost, ready to enrich your garden.
In this tutorial, we will construct a compost bin with three bays, but you can adapt this guide to create a single bay, a two-bay, or a smaller 3-bay compost bin as needed. Previously, we managed with just a single bin at our former urban homestead, and it served us well!
Our New Compost Bin Plans and Design
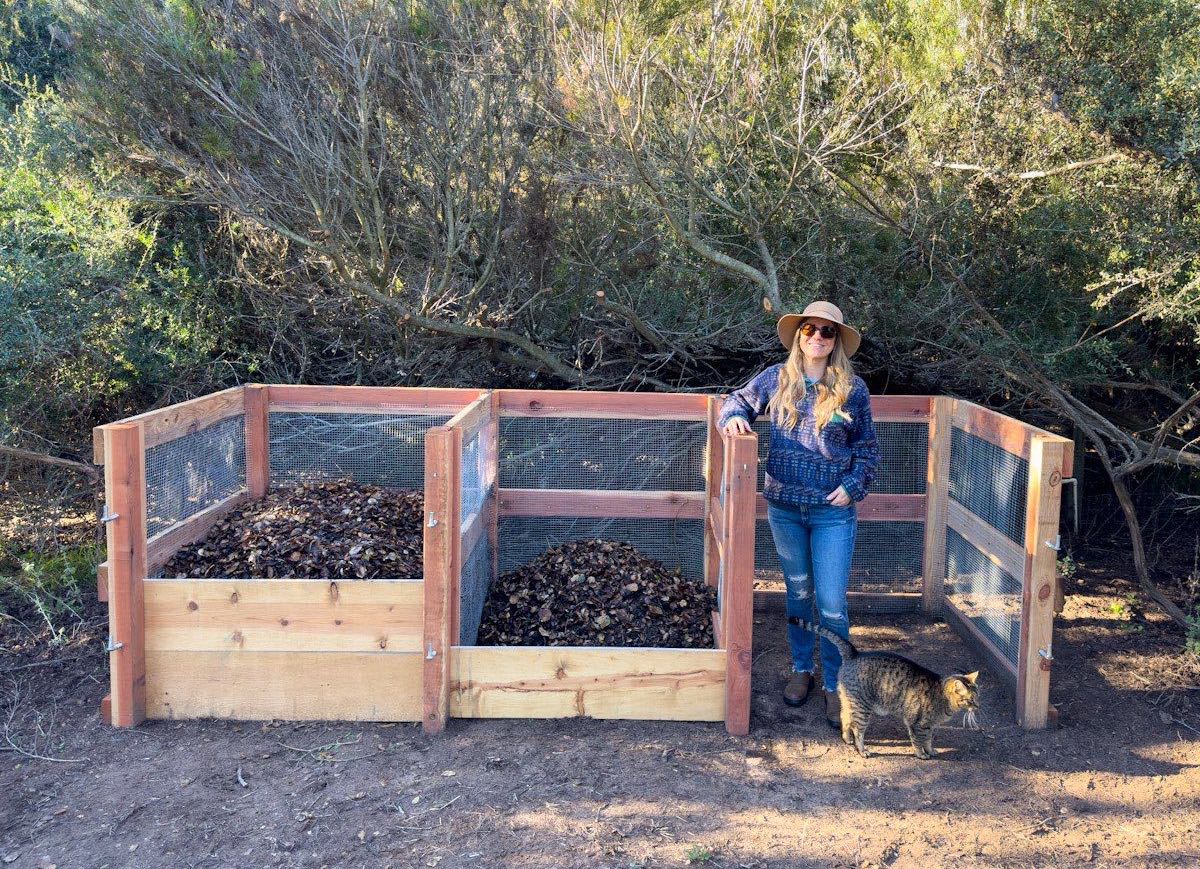
Below, you will find photos and diagrams of our 3-bay compost design. The compost bin showcases three bays, each measuring 4x4x4 feet, with an overall footprint of approximately 12×4 feet. Additionally, I’ve included a simplified design drawing for an alternative compost bin that you may choose to adopt (please note that lumber dimensions and instructions may vary slightly).
Our compost bin design features removable face boards that can be inserted into tracks or slots along the front side of each bay. This configuration allows for compost to be piled high without spilling out the open front. This design maximizes the bin’s efficiency and capacity, which is particularly advantageous for rapid decomposition and effective hot composting!
It’s important to note that our DIY compost bin was designed with specific requirements in mind. We wanted it to be durable, functional, aesthetically pleasing, and, most importantly, donkey-proof!
Donkeys, Gates, and Design Flexibility
Our four miniature donkeys, each weighing around 250 pounds, love to rub against wooden posts and structures. We needed to construct the compost bin in their pasture for convenient manure management. Consequently, we selected extra sturdy lumber and added additional support braces to ensure the bin could withstand their playful nudges.
In addition to the removable front slats, we incorporated hinged gates at the front of each compost bay to keep our donkeys out. These gates can be easily removed or installed, and they also provide a barrier against other critters!
It was crucial to ensure the width of each compost bay was precise, as the gates needed to fit perfectly on the front. Additionally, the walls had to be straight to allow the gates to hang squarely and level. Although the gates are relatively light, they do add weight and pressure on the compost bin walls, so I recommend adding them only if necessary.
For those of you who may not have the same unique challenges, feel free to be more creative and flexible with your compost bin design! It’s perfectly fine if your bays are not identical in size or perfectly level.
Supplies Needed to Build a Compost Bin
Here’s a list of the tools and supplies we used to construct our compost bin, along with some alternative materials you might consider using. A condensed supplies list and instructions can also be found in the printable guide at the end of this post.
To ensure proper airflow for the compost, we designed our compost bin with minimal wood and lined the walls with hardware cloth instead. For our bin size, you’ll need approximately 25 to 30 feet of 4-foot wide 1/2″ hardware cloth.
Hardware cloth is an excellent choice for a compost bin for several reasons: a) it remains taut and won’t bend or bow under the weight of the compost; b) the small gaps effectively hold tiny bits of compost IN while keeping vermin OUT; and c) it’s galvanized, meaning it won’t rust and will last indefinitely!
Alternatively, you might consider using chicken wire, but if you do, I recommend adding more wooden slats for additional support. Keep in mind that chicken wire is prone to deterioration over time, and smaller animals can easily slip through the gaps.
Step 1: Choose a Location + Site Prep
Choosing the ideal location for your compost bin is crucial. It should be close enough to your garden or home for easy access but situated far enough away to avoid any unpleasant odors or flies. A well-maintained compost pile should not emit foul smells!
It’s also essential to place the compost bin on relatively level ground. Given its considerable size and weight, we constructed our compost bin in its intended spot, using a landscaping rake to smooth the ground surface beforehand. Alternatively, you could assemble the smaller side walls on a flat work surface and then transport the completed bin to its permanent location.
Moreover, it’s advisable to leave the bottom of the compost bin open to the native soil beneath it. This allows for drainage, beneficial microbe exchange, and natural earthworm activity, making it easier to turn or scoop out the compost without hindrance.
Step 2: Measure and Cut Wood
Next, gather all your lumber, take measurements, and cut the boards to the desired dimensions of your DIY compost bin design.
TIP: Before securing with screws, verify that everything is square using a carpenter square or measuring tape. I like to measure the distance between the 4x4s at both the top and bottom to ensure they match. While one person holds everything in place, the other can secure it with screws.
The compost bin requires two interior walls spaced 4 feet apart. For our design, the inner walls are spaced at 43.5 inches when measuring from the inside of each 4×4, as illustrated in our design drawing.
If you prefer, you can move on to Step 6 and add hardware cloth to the back and side walls first, as shown in the photos, provided the cloth won’t obstruct the placement of the two inner walls.
Step 3: Build Compost Bin Outer Walls
To construct the outer walls of the compost bin, lay two 4×4 posts on a flat surface, spaced to the width of the wall. Then, position three horizontal 2×6 boards across the 4x4s: one at the top, one at the bottom, and one in the middle.
Ensure the ends of the 2×6 boards are flush with the sides of the 4x4s. Use long screws to secure each 2×6 to the 4×4 posts. Repeat this process for the second outer wall.
Once the two end walls are assembled, you can stand them up and connect the long boards along the back to create a U-shape. It’s best to position everything where it will remain long-term since the weight of the compost bin will increase as you add materials.
Make sure the 2x6s remain on the outside of the bin, with the 4×4 corners facing inward. Check that the walls and back boards are relatively level throughout the assembly process.
Step 4: Install Back
In our case, we used 8-foot boards for our compost bin, which required us to build the back in segments. By connecting 8-foot boards and 4-foot boards together in the middle with an additional 4×4, we were able to achieve the total length of 12 feet necessary for the back.
This additional 4×4 serves as the base for one of the center walls. In our design, the inner walls consist of three boards measuring 44.5 inches, connected between a 4×4 on each end.
To secure the boards, we utilized fence rail brackets, placing one at the top of the 4×4, one at the bottom, and one spaced in the middle. First, attach the brackets to the 4×4, ensuring they are centered and level before sliding in the 2×6 boards and securing them with screws.
Step 5: Add Inner Walls
After constructing the frame of the compost bin, it’s time to add the inner walls. You can choose to assemble these separately and then attach them to the back wall, or you can build them in place.
After securing the inner walls, proceed to attach the hardware cloth to the inside walls and back. Be cautious while handling the hardware cloth, as it can be sharp and scratch easily!
Instead of wrapping the entire bay in hardware cloth at once, it’s more manageable to measure, cut, and attach each wall’s hardware cloth individually.
It’s acceptable to overlap the hardware cloth onto the 4x4s along the back wall and corners, but keep it flush with the front side to avoid obstructing the removable front boards.
Step 6: Add Hardware Cloth
Now, let’s move on to adding the hardware cloth. Secure the cloth along the inside of the walls using cabinet screws, ensuring to pinch a corner section of the wire mesh under the wide head of the screw. Space the screws evenly along the walls.
Next, install a vertical 2×4 on the inner wall of each bay, with two total per bay. Use screws to attach each 2×4 approximately 1 inch to 1.25 inches back from the 4×4 at the front of each wall. This spacing allows the face boards to slide in and out smoothly.
It’s essential to measure to ensure the spacing is consistent along the entire length, allowing the removable face boards to move freely up and down the track.
Step 7: Removable Face Boards
Wait to cut the removable face boards until your compost bin and tracks are entirely assembled! Measure the front slot for each bay, as we found that the width of our bays varied slightly. You may need to cut custom boards of different lengths to ensure a proper fit.
To provide added stability to the walls, install flat corner braces at the top of each wall. Additionally, attach lightweight gates at the front of each bay, secured closed to the 4x4s with eye hooks and carabiner latches. Ensure the J-bolts for the gates are oriented upwards to facilitate easy removal when necessary.
For extra vermin protection, you can also consider building and attaching a hinged lid to each bay using wood and hardware cloth.
Step 8: Finishing Touches
At this stage, your compost bin is nearly complete and ready for use! However, we opted to add a few finishing details to enhance its appearance.
I chose to stain the pine front boards (only on the outward-facing side) to help them blend seamlessly with the overall design of the compost bin.
That’s how we constructed our compost bin! While this may seem like a lot of information, I trust that the added details and visuals have clarified the process for you. If you have any questions, please don’t hesitate to leave a comment!
And that’s how it’s done.
Now that you’ve built your compost bin, you might be wondering how to utilize it effectively. I promise to follow this up with a guide on how to use a 3-bay compost bin, along with tips on creating a hot compost pile. In the meantime, don’t miss the related articles listed below. If you found this information valuable, consider sharing or pinning this post, and we appreciate your feedback!
How to Build a Compost Bin (Wood 3-Bay Compost Bin Design)
To summarize, here is a quick overview of the tools and supplies you’ll need to construct your compost bin:
- 1 Electric Saw
- 1 Measuring Tape
- 1 Aviation Snips (for hardware cloth)
- 11 pieces of 8-foot 2×6 boards (or three 12-foot boards + six 8-foot boards)
- 4 pieces of 8-foot 4x4s
- 3 pieces of 8-foot 2x4s
- 5 pieces of 8-foot 1×12 boards (or nine 4-foot long 1x12s)
- 2 ½ to 3-inch outdoor wood screws or decking screws
- 1-inch or 1-1/4″ wide head cabinet screws
- 12 Fence Rail Brackets
- 30 feet of 4-foot tall 1/2″ hardware cloth
- Optional: 4 flat corner braces for added stability
- Optional: 4-foot steel tube gates for each bay
Would you like to save this?
Would you like to bookmark this guide for later use? You can save this post for future reference as you embark on your composting journey!
FAQ: Should a compost pile be in the sun or shade?
When it comes to the placement of your compost pile, both sunny and shaded locations have their advantages and disadvantages. A sunny spot will help warm the compost, speeding up decomposition. However, excessive sun can dry out the pile, necessitating more frequent watering.
On the other hand, a shaded area will keep the compost moist but may slow down the breakdown process. Ultimately, the choice depends on your specific conditions and preferences.
Step 1: Select and Prep Site
Begin by choosing a location that is relatively level and ideally situated near your garden. Whether you decide on a sunny or shaded spot, each has its benefits. Sunlight will accelerate decomposition, while shade will maintain moisture levels.
Ensure the bottom of your compost pile is open to the native soil. Clear away any debris and level the ground as needed.
Step 3: Assemble Exterior Walls
To build the outer walls, cut four 8-foot 4x4s in half to create eight 4-foot corner pieces. For the exterior walls, cut six 8-foot 2×6 boards to 51.5 inches in length, leaving the remaining pieces at 44.5 inches for the interior walls.
Step 4: Add Back to Exterior Walls
Retaining three 8-foot 2x6s for the back wall, cut two more boards to 48 inches to complete the 12-foot back. Alternatively, you can use three solid 12-foot boards.
Step 5: Build and Add Interior Walls
Continue by adding the two interior walls, spaced approximately 4 feet apart in the center of the bin. You can assemble them separately or construct them in place on the back walls.
Step 8: Optional Finishing Touches
Finally, consider adding some finishing touches. For instance, stain the outward-facing side of the pine front boards to enhance their appearance and integrate them into your yard’s aesthetic.